Thursday, 3 March 2016

changing tires, bike shop style (not a rant, really)

The following is an excerpt from Cyclepath Mississauga's employee handbook. It is a detailed how-to on tire changes for entry level mechanics. Tire changes are the bread and butter of any good bike shop so a proper tire change is the first thing any bicycle mechanic should learn. Outside of the shop, any BMX rider reading this blog can use this guide to make sure they're doing their own tire changes properly, and can also make sure they handle tire changes on their friend's and family's non-BMX bikes the way the manufacture intended.


Peter’s Tire Change 101

Types of tires

There are two common designs for how tires are mounted to rims. The first and most common is the clincher tire. These tires use an innertube (or sealant in the case of tubeless tires) to hold the air inside the tire while the tire itself is mounted to the rim by a wire or kevlar bead. This hooks into a lip inside the rim as the tire inflates. A tubeless tire functions the same way but it uses sealant instead of an innertube to hold the air. The other design you may see is the tubular tire. These tires essentially have their innertube built in and are mounted to the rim with glue instead of a hooked bead. Tubular tires are almost exclusive to vintage or high end road bikes.
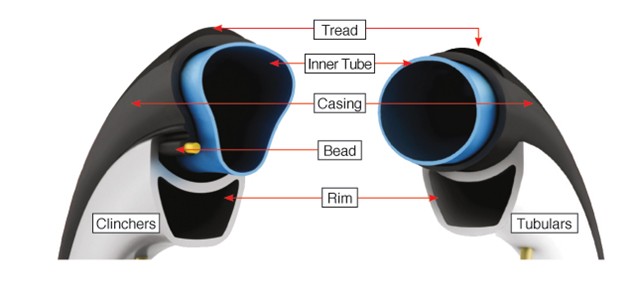
clincher and tubular.jpg
99% of the bikes you see will use clincher tires with innertubes. In the case of both tubular tires and tubeless tires which use sealant, the job should be performed by a senior mechanic. Both of these tire setups must be installed in a unique way.

Tires sizes

Tires can be broken down into three basic types to keep the sizes straight; Kids, Mountain, and Road. Each tire has three numbers designating its size. For example, 26” x 1.95 (559) is one of the most common sizes for department store mountain bikes. The first is the diameter (26’), the second is the width of the tire (1.95”), and the third is the BSD or Bead Seat Diameter. This is the precise diameter of the hooked bead’s interface with the rim. In most cases, the BSD can be ignored if the regular diameter and width match. If a tire looks like it should match a rim but doesn’t, check that the BSD’s match.

Road tires generally use metric measurements, with the exception of the old 27”x1 ¼” tires, which appear on old steel framed road bikes. You may see some other unusual sizes such as 650c, but in general you will see 700c x _____ (622) on road and hybrid bikes. Road bikes usually have a width between 20mm and 28mm. Hybrid and cyclocross bikes can use tires as wide as 45mm if the have the clearance.

Mountain tires come in three common imperial diameters: 26”, 27.5” (also known as 650b), and 29”. The widths vary from around 1.5” for street use, 2” for XC use, 3.5” for DH use, and 5” for fat bikes.. 26” and 27.5” tires are largely only compatible with their own sizes but 29” rims have the same BSD (622) as 700c wheels, meaning that wider hybrid tires will fit on a 29er wheel for street riding.

Kids tires come in a wide variety of diameters, but they all have a width around 2”, give or take. Bike shops tend to sell 12”, 16”, 20”, and 24” kids bikes, along with 20” BMX and some 18” BMX. 14” and 18” sizes are usually sold as childrens sizes at department stores so the options for replacement parts are not as plentiful.

You may see some older standards on older bikes. Pre-1970 cruiser bikes sometimes use 26” x 1 ⅜” tires. These are not compatible with normal 26” tires. A similar standard is used for wheelchairs, which use 24" x 1 ⅜” tires. Again, these are not compatible with regular 24” tires due to a the Bead Seat Diameter being measured from a different point.

As a general rule, equivalent conversions between decimals and fractions does not mean two tires are identical. A tire with an indicated size of 26" x 1.25" is NOT compatible with a tire with an indicated size of 26" x 1 ¼"  because the change in units indicates a change in where the measurements are taken from.

Valves
There are three types of valves, two of which you must know how to use. The standard Schraeder valve is identical to a car and can be use with a regular air compressor head. Higher end bikes use a Presta valve, which is skinnier, must be opened and closed manually, and holds air longer at high pressures than a Schraeder valve. Dunlop (also known as Woods) valves are outdated and must be changed to the appropriate Schraeder valve tube.
presta-valve-vs-Schrader-valve-vs-dunlop-valve.jpg


Changing the tires

A tire change takes the average person half an hour from start to finish. Ideally this job should be fast and simple, taking around 10 minutes for a shop mechanic. The finished product should be perfectly seated so the tire runs round with no lumps and pumped to an ideal pressure roughly in the middle of the tire’s recommended range.

step 1
Remove the wheel(s) that need repair from the bike. Remove any remaining air from the tires by pushing on the valve cores. Most tires can be both removed and installed by hand, using force from the thumbs and palms. Tires that are too tight to remove by hand should be removed with tire levers. NEVER USE A SCREWDRIVER. Insert the lever under the bead and push down, forcing the bead off and out of the rim. Repeat for the inner bead.
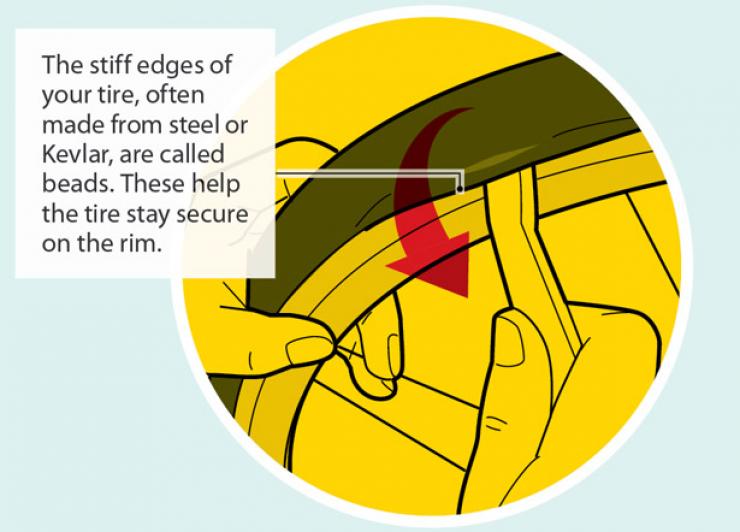
remove with levers.jpg

step 2
With the old tire removed, separate the tube and tire and carefully inspect any parts that will be re-used. If the tire is be re-used, carefully run your hands inside the tire to check for foreign objects embedded in the tread. Tires that still show tread depth and are not dry or cracking can usually be re-used. Check the rimstrip for damage, and replace if knicks or wear are found. If the wheel needs to be trued, this is the best opportunity.


step 3
When installing the tire, install the first bead by hand. Make sure the logo on the tire is lined up directly across from or directly at the valve hole. This makes it easier to locate later punctures and looks professional. Put some air in the new tube just so it hold shape. Insert the valve first,  then carefully push the tube into the tire all the way around. Some talcum powder applied to the tube may make it easier to push into the tire.
insert tube.jpg
step 4
Most tires should be installed entirely by hand. Starting at the valve, use your palms to push the bead onto the rim, being careful not to pinch the tube between the rim and bead. If the tire is too tight (usually occurs with tubeless or high pressure tires), carefully use tire levers to install the tire by turning the lever around and reversing the process used to remove the tire. Remember to check that the tube is out of the way before each use of the lever and that you don’t scratch the surfaces on tubeless rims.
install with levers.jpg

step 5
Check over and reinstall the wheel(s). Inflate the tire in small increments, to a firm pressure, ensuring the bead is properly hooked onto the rim. Reinstall the wheel and make sure the valve has a cap.
Check that the wheel is properly aligned in the frame and that quick release skewers are closed properly. Rear wheels cost more in labour because mechanics have to work around the gears and brake. Make sure the brakes and gears are working as well as possible and advise customer if any parts should be replaced or any additional service is needed. Finally, if the chain is dry, give it a light helping of lube.

Tuesday, 29 December 2015

Peter's Ranting: The Hustle

Canada ain't a total freezing hellhole this winter. It's been t-shirt weather until mid December, and the first real snowfall was after christmas. The glorious El-Nino effect (hauntingly global warmingy as it is) is gone now, and it's nasty out there. I did a little trip to Joyride 150 (click here to see on IG) with Dan and Nash to escape the nastiness. Dan and I have ridden at Joyride countless times, but this was Nash's first introduction to the idea of a bike park and the idea of real jumps. This departure from street riding was so refreshing to him he requested a park-specific bike so he can keep up when his work with Boss Culture leads him to join us on Schedule BMX trips. That same day, Julian, another of our old friends got in contact with me and mentioned his bike was in a poor state. Unlike Nash, Julian rides burly street exclusively. This set a good stage for an experiment. I wanted to see if my used bike hustling skills were still up to par. On a tiny budget of about $200 and on 48 hrs notice, I called my contacts and got on Kijiji. Through buying a few parts and trading a LOT of parts, I managed to put together two bespoke bikes with specific build guidelines.

The completion of these bikes got me thinking. Ever since before Schedule was dedicated to BMX, friends of Schedule have always gotten hookups on bikes and I put a lot of effort into keeping them rolling. As recently as a few years ago though, getting a light, modern bike was a real challenge. When I first started working with used bikes before high school, my budget was never more than $100 so the best bikes I could buy were old, heavy customs from the 90's. Bikes like my old Volume Dinosaur and Haro Mirra 540 were cheap and strong enough to last a few years, so we were satisfied. But around the time I started college, I had been working at Cyclepath long enough to make money and connections for good mid range bikes. Fit and Mirraco completes were lighter than what we were used to and still strong so we became satisfied with them. Even when we got an aftermarket frame like our Subrosa Villicus v1, we ran OEM parts on it because it was what we knew, and we considered these bikes the best we would ever need. Now Schedule BMX riders have high end customs like my Subrosa Silva and Quinten's Fit Mac. I don't use stock wheels any more. I always custom lace my own unique wheels with aftermarket parts. All my sealed bearings run like butter. I see new parts coming out and I don't feel the need to buy them because my parts are well chosen exactly as i like and trust them. And yet I don't spend any more than I did in high school on bikes. I still buy used or on sale only, and I almost never spend more than $100 on a bike at once.

So how did the used BMX market go from a Haro F2 costing $100 to a Dartmoor Yuki or a Cult costing $100? How did it go from a 35 lb. bike with big gears, tiny bars, 1-pc cranks, and loose-ball bearings all the way to full chromoly, sealed bearing, 25 lb bikes with tubular cranks and modern geometry in about a decade? Well I got into it in my previous rants, but basically machining technology has gone up, production costs have gone down, and BMX has turned from a fashionable mode of transportation back to a genuine sport in the mainstream since the slump in 90's to mid 00's. Because people want bikes that are strong and light, companies have been getting more competitive, so you can get a full chromoly bike for under $500 new. With a warranty and free service, the shiny new options are pretty tempting. Keep in mind a decade ago that 35 lb Haro cost that much new. This means that BMX bike have an inherently lower resale value, but at the lower price they are easy sales to riders who do their own bike repairs or are on a budget. They can be hustled for a reasonable profit or to realize a squad goal.

So first I build Nash's bike. I contacted an friend and picked up the Dartmoor Yuki frame that hasn't been used in a while. It's full chromoly, light, and has super tight responsive geometry. The removable brake mounts and low stand over checked Nash's needs for a park setup, the slimmer seat will allow the better range of motion he wanted, and the wheels and tires are from Revenge Industries and Animal respectively, and will give him the durability to ride a little street when needed. The last thing on the list of requirements for this build was a subdued colorway with a heavy emphasis on black, white, and gray.

Julian's bike had fewer specific requirements. He's been a friend of ours since high school and he's been riding the same bike since. It was a bad bike when it was new, and every part had worn out over the years. Anything would have been an improvement. He requested that the seat be reasonably low and that the frame be gray to go with the gold Black Label wheel I had lined up for him. I felt he needed fresh tires, so I found a barely used set of Premium Refuse/Resist fat tires. A full chromoly frame was obviously a requirement, and this Cult checked that box with good street geometry. Other than that, this build was fairly open but came out feeling solid, stable, and comfortably spaced out despite being built on a budget.

Building each of these bikes, starting from a stock complete and building up could have come close 800 each easily. On a budget of $100 each, I managed to build two solid, modern setups where even the stock parts are of reasonable quality. If I worked a little sales magic on the used market, I could easily double my money selling these bikes. If I hustled hard and pushed a tough sale, I could sell them for much, much more. I could then start all over again, and make another lump of profit with the next setups.

These bikes aren't for profit though. They're for working on the BMX community on a grassroots level. They're for friends who ride and want to get more serious, and they're for friends who have strong social circles outside of bicycles. Every rider they bring into the fold strengthens the BMX community, and every new rider is a potential opportunity for Schedule BMX. The More, the Merrier.


Fat, Jolly Christmas and a scintillating new year from myself and the rest of Schedule BMX

-Peter Collins

Sunday, 1 November 2015

Peter's Ranting: 4130-101

So this isn't a riding update or anything, I just want to clear up a few misconceptions and questions i'm often asked or told at Cyclepath or local spots. These misconceptions and questions are related to BMX frames. Everyone knows that 4130 means Chromoly which mean good, 1020 means Hi-Ten which means bad. I hear a lot about frames manufactured overseas being lower quality. I'm told that "old" frames, even a few years old, feel dull and heavy because the steel loses its springyness. I've even had a kid pull out a periodic table from his grade 10 textbook and try to use it to prove chromoly isn't steel. Most of the time when i hear stuff like this, it's because someone heard it from a friend or read it on the internet and took it as gospel truth. If you want to do more research on this topic, I'd recommend clicking on Sheldon Brown's name if you want good detailed information. It's not a BMX related site but the facts about bicycles in general are relevant here.

Chromoly steel is represented by the number 4130. A lot of riders assume that higher numbers equate to better quality tubing. This is not true. The numbers associated with metals actually contain information about the metal. 4130 is a family of steels designated by the SAE (Society of Automotive Engineers). 4xxx steels are Molybdenum steels. 41xx steels are Molybdenum steels with one other material, Chromium. That's why it's called Chromoly. The last two numbers indicate the carbon content of the metal. In this case, the number 30 indicated a .30% carbon content, making Chromoly a high-carbon steel. The high carbon content allows the frame to be heat treated, but makes the material slightly harder to weld. Hi-Tensile steel, known as 1020 is a plain mild steel, indicated by the 1. The first 0 indicates no extra alloys. The 20 indicates a .20% carbon content making the steel a low carbon metal that cannot be heat treated effectively for use in bicycles. The reason 4130 is better than 1020 steel is that in bicycle applications, the greater strength to weight ratio makes the bikes easier to ride, the alloys make the material more hard wearing (rust resistance, etc.), and the vibration qualities are arguably more pleasant to ride. In applications outside bikes where weight isn't a factor but malleability is, 1020 steel may be the better choice.

Now that I've cleared up what 4130 is, I feel like I should clear up the difference between strength and stiffness. Imagine you walk up to a tree in the early summer. Imagine you pick up a dry stick from under the tree and you try to bend it. It won't bend. It will stay the same shape until it snaps. This stick is stiff but weak. Now imagine you rip a fresh stick the same size and width from the tree and you try to bend it. Because it's still full of moisture, it's soft but it will bend a fair amount before finally snapping. This stick is soft but strong. It takes a greater amount of force to make the stick break, or yield. 4130 is used in BMX frames instead of 1020 steel or 6061 aluminum, for example, because it strikes the best balance between strength and stiffness. An impact that may dent a 1020 frame or crack a 6065 frame or otherwise push a frame past its "yield point" would ideally put a tiny distortion in a 4130 frame and not much more. The same applies for longevity in terms of regular wear as well as impact damage. Aluminum frames don't rust, but are so stiff they fatigue noticeably with time. Mild steel frames will rust much more easily than a 4130 frame. 4130 is just right.

Continuing with the topic of metal fatigue, 4130 frames do experience fatigue but they are extremely long lasting if well maintained. No matter how bad it is, even if it's about to die, steel frames do not "go dead" or lose their ride quality with use. Any wear that may compromise the ride quality would be a big, visible crack or hole that allows the frame to flex beyond its normal range of motion (or past its "yield point") and would render the frame unusable anyways. No matter hold old your steel BMX frame is, it will always provide the same ride as it did when it was new because the elastic response, or elastic modulus, of the frame is an inherent quality of the metal that never changes. In fact, all kinds of steel have the same basic elastic modulus, regardless of age.


The differences between different brands of tubing and frames from different manufactures is not in the metal, but in the design and manufacturing technique. The inherent qualities of steel never change. For example, if you made two identical frames but made one from 4130 and one from 1020, they would be the same weight and have the same elastic modulus. The different alloys in 4130 steel actually allow manufactures to make frames differently (thinner tubes, butting, CNC, and other machining techniques) to dial weight and ride quality while maintaining the same strength. When someone tells you that a frame manufactured overseas won't be as good, they're usually wrong but even if they are right, the metal has nothing to do with it. If a Taiwanese company and and American company both made identical frames out of identical Reynolds steel, both frames would provide identical ride qualities and the same overall strength. The differences between the American frame and the Taiwanese frame would be that the Taiwanese frame would cost a little bit less due to lower production costs, and the American company would be able to provide better customer service (i.e. faster warranty) being based on the same continent. Country of origin does not affect the quality of the bike.

I'm done. Sorry for ranting like a crazy homeless guy. I might do a rant about frame geometry later this week.


Thursday, 22 October 2015

Mississauga's Downtown (Photo's only, bro)

When we're all injured or otherwise occupied, the few of us that are free will just go and take photos for the sake for taking photos. No tricks because they're not even needed. Mississauga just looks so damn good that just having a bike and a camera turns out great results any time. 

Peter and Avy in Mississauga's City Center area 


https://instagram.com/boss_culture/
https://instagram.com/cyclepath_veloraptor/


Tuesday, 23 December 2014

hook 'em while they're young.

I took my 8 and 6 year old cousins to Joyride 150 bike park. these were two kids on very basic bikes who had never even seen a bike park before. they gave an impressive show, riding faster and with more control than i ever expected from them. give 'em a few years, i'll have them pulling table tops over half pipes. I wish i could have done this kind of thing at their age.

Tuesday, 2 December 2014

Dan and Jimi bikechecks


Dan's WTP Sleepless 20.6"
bars: Volume Bourbon St
stem: Animal Jumpoff
grips: ODI Longneck soft
headset: WTP
fork: Macneil CKS
wheels: Profile Elite laced to Sun Rhyno-lyte welded
tire: Animal GLH
chain: Eclat Diesel
crank: Premium 1948
sprocket: Fit keyguard
pedals: Black Label graduate
seat: Demolition

Jimi's Fit Mac 21.25"
bars: Fit Mac raw 8.5"
stem: Eclat
grips: Delmolition
headset: Black Label
fork: Snafu Magic
brake lever: Tech99
brakes: Odyssey evo2
front wheel: Vandero2 laced to Gsport
rear wheel: Gsport Ratchet laced to Alienation Runaway chrome
tire: Black Label
chain: Eclat Diesel
crank: Demolition
sprocket: Macneil 28t
seat: Norco


Sunday, 23 November 2014

Peter's BSD WZA v3 bikecheck


Frame - 20.6" butted chromoly BSD WZA v3
BB- 1664
Fork - SNAFU pickle
Bars - Salt+ 8.75"
Stem -Black Label hedlok
Grips - WTP elbarrio with Mosh bar ends
Seat - Kink Solace
Rear Wheel - Eclat Pulse set to LHD laced with double butted DT's to Sun Big City Lite
Front Wheel - Eclat Pulse laced with DT's to Supra Dome
Cranks - Demolition Medials
Pedals - low profile Wellgo
Sprocket - Black Label 6061
Chain - KMC
Tyres- Black Label Mobstar